Cistern Installation

This post is:

A) Delinquent

B) Out of order

C) Heavy on pictures

D) All of the above.

Answer:  D

But – having just resized and naming several pictures of the cistern install, felt that there was no time like the present.  After looking at several options, we have partnered with Rain Pro NC and Mike Stroud for our rainwater collection project.  Mike’s choice of Infiltrator Systems potable water storage tanks seemed like a perfect solution, and because we want the option of using rainwater for potable water, being able to treat any rainwater, using a potable water tank and then NSF approved filtration and UV sanitation seemed like the best way to give us the most options.

Because our overall site plan uses a lot of retaining walls and we’re working hard to minimize the disturbed area outside the walls, we needed to do the cistern installation early on.  We also had to plan for any retaining wall penetrations prior to the site pouring of the walls – which meant all the water flow / elevations also needed to be determined.  Hope our math was all correct…

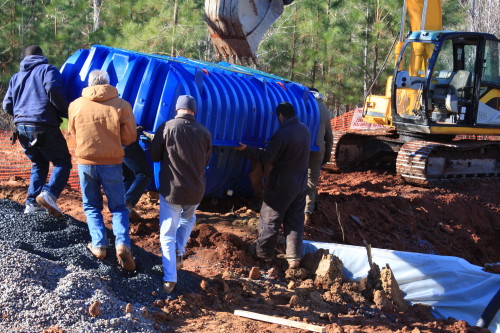
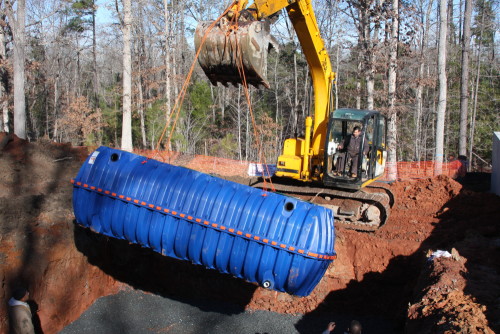
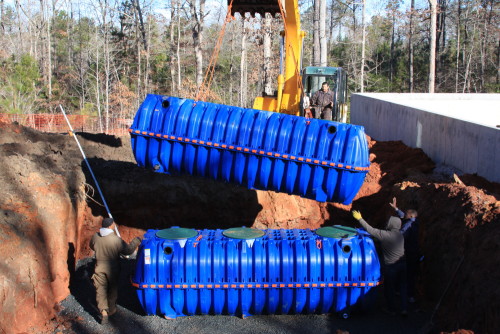
The location of the cisterns is outside the west wall.  Luckily, the southern end of the west wall is “short” meaning that the existing grade is relatively the same on both sides of the wall before and after our cut and fill work.  We dug a LARGE hole, and had to ensure the hole was 1) deep enough and 2) level for the installation of the 4 cross connected tanks.  The big excavator was actually “driven” over the retaining wall but using a build up of dirt, and putting the excavator on the trailer and dropping it on the other side.  (Hat tip to engineer hubby for figuring that one out – and also to GC Richard for putting plastic over the wall to make sure we didn’t have a permanent red clay stain…)
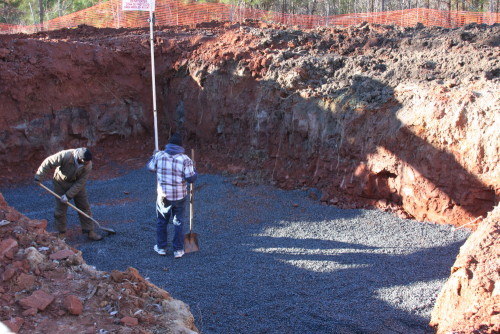
low and level!

low and level!

The Infiltrator Tanks have a great sealing system and come in 2 halves, making them reasonable to ship.  Other tank solutions are one piece – REALLY heavy, and the cost to ship them (because of course there are no local-ish manufacturers) is prohibitive.  The 2 piece design also makes them reasonable to move around the site.

tank arrival

tank and gasket

Carrying 3

Install 1

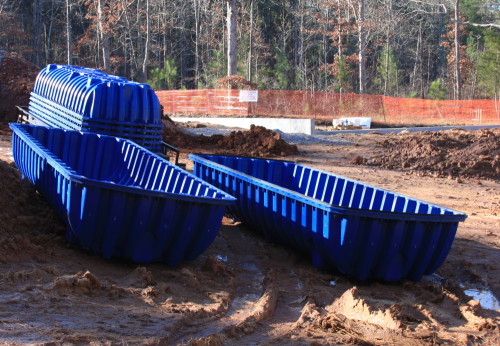
We looked at our water usage using our water bills over the past year or two to size the amount of storage we might need, and then calculated the amount of roof we have (tons- like 11,000 square feet because of the ranch design of the buildings) and then the average monthly rainfall, what happens in a drought, and how much water we could capture in a heavy rain.  Lots of math later… we decided on 4 cross connected tanks for about 7000 gallons of water.

Install 2

finishing touches

plumbing the tanks

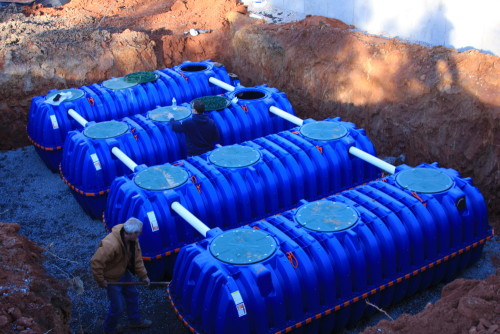
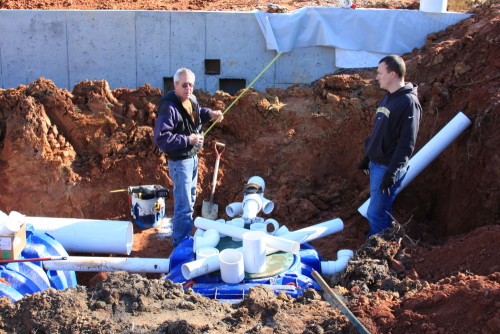
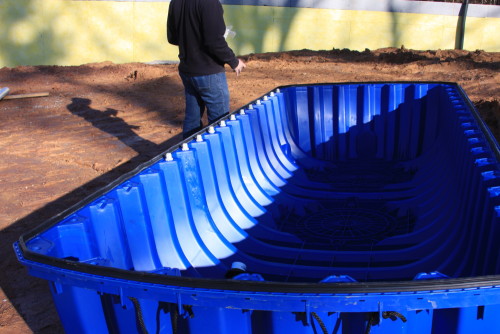
The tanks are cross connected at both the top and the bottom to be able to equalize the pressure and the accessibility. The top connection also managed the overflow when the tanks are full.  We also incorporated a “first flush” feature. The first flush is used to capture the first bit of rainwater collected in an “event”.  This first water is the most contaminated because it’s hitting the dry roof and rinsing any contaminants with it.  So – the first flush is a big pipe that takes the first water, fills up, and when it’s full, the water is diverted to the tank.  It does this by just having the large pipe capped off with a slow leak.  Genius!

starting first flush

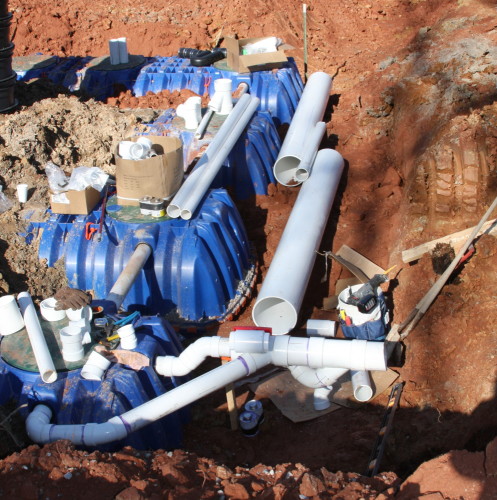
After the tanks were set, cross connected, and all the fittings for the first flush and overflow completed, we had to partially fill them to get some weight in them, and then partially backfill them so they would be protected and not shift.  While the tanks can support the weight of a vehicle – because they are outside the wall, we really don’t want anything back there shortly.  We will be backfilling up to the level of the black risers shown.  The risers provide access to the tank for any pump issues or maintenance.

risers and first flush

First phase complete.  We’ll be back when we get the rainwater management plan working after the cut / fill / compaction and probably footings.

Merry Christmas!

LEED for Homes 4, Passive House, Energy Star, DOE Challenge Home, and and and…

There seems to be a decent amount of alphabet soup or certification “choice” when it comes to energy efficiency and measuring your “green-ness” – but realistically, what does it mean and what is it worth?  We’ve already established that the mortgage industry and the appraisal system doesn’t give it a hoot, and since we’re not a builder – what the heck does any of this stuff MEAN to us?  Overall, nothing.  Well, that’s not entirely true – it should result in lower operating costs and a “better” home.  But at what cost?  What’s the payback calculation?  There’s no way in Hades that we’ll ever pay for our uber windows in energy savings with anything close to the current rates for power in the US. So why do it?

Maybe we’re looking at this wrong.  It’s not about the certifications, (although we believe they DO have value for both builders and suppliers of the materials for the project) it’s about building the High Performance Home.  THAT’S my new personal certification – HPH.  Everyone else seems to have a certification program – why not me?  HPH fits a theme here – we have high performance “stuff”.  My daily driver car is a 469 HP station wagon.  It’s not the highest HP car out there – but in it’s class, it’s top of the heap.   Henry drives a Dodge Cummins diesel dually pickup.  All the wheels and all the torque – a high performance towing machine.  We have a little vice in that we drive Dodge / SRT Vipers.  Very high performance American muscle.  This level of high performance may not be necessary, but it’s pretty cool when you can achieve it.  And ultimately, that’s what we want for our house: quite simply, a house that performs to the level of the rest of our lives.

But- since HPH is not a globally recognized certification (yet), what are our options?

LEED can be regarded as being a little prescriptive  and judgmental (after all – what the hell would we do with an electric car charging station? Unless I get a Tesla) and there’s a lot of focus on stuff we can’t control – we’re not an infill lot and our “walkability” score is pretty low.  But then DOES cover things like Indoor Air Quality which we believe to be a real benefit to living better.  LEED incorporates this measure, and also Energy Star into its rating system, so you are getting a little more bang for your buck here.  And maybe feeling that you are looking at your home’ performance from a multifaceted approach, and building a High Performance Home.

But then you look at Passive House – I call this the Engineer’s certification.  It’s VERY much performance based and focused on energy usage, and not wasting energy.  This certification becomes very much a numbers game.   Without being all that smart on Passive House – it’s close to saying that your energy usage is about 10% of something “normal” for your home’s size and location.  It also says that you take advantage of passive means to heat (and cool or avoid heat) the home – so using solar warming of a slab concrete floor, for example.  In this regard, Passive House is right up our alley.  They are VERY interested in building envelope performance- with requirements for multipoint blower door tests and other more stringent qualifications.  The other good news is that Passive House seems to be “flexible” in how you meet the requirements – and for an out of the box project like this – that’s GOOD news.  So – this very much works with the High Performance Home theme.  Passive House also incorporates the Department of Energy’s Challenge Home criteria – so again – more recognized certs as part of a higher level program.

With this in mind, we’re going to see if we can meet Passive House without any major design or building plan changes, as it’s highly regarded as a standard for PERFORMANCE.  Once we know if we can pre-certify – we’ll show you the numbers and talk about it more and see if it really makes sense to got for the full certification process or just “built to the Passive House standard” that often gets used instead.  In the meantime – let’s hope we can nail a high performance BUDGET…

If all goes well, we’ll be able to move to submit for our building permit this week – another milestone we need to make.  Onward!

P.S.  What do you think of the new rendering???

Deep dive – everything you possibly want to know about concrete sandwich panels

So at a more detailed level – what are concrete sandwich panels??  Basically they are panels consisting of concrete as the “bread” of the sandwich with insulation as the “meat” of the sandwich.  In the case of the panels offered by International Precast they consist of 3” thick high psi reinforced concrete wythes of concrete with either 2” or 4” of Polyisocyanurate insulation as the interior.

IP_Sample

A surprising and very important differentiator of the International Precast concrete sandwich panels is that International Precast claimed that they could deliver panels where the interior and exterior wythes are not connected by any thermal bridging material – they would be completely isolated by the interior insulation.  We quizzed them at length on this claim but they were able to demonstrate to our satisfaction that they could indeed deliver on this claim.  This opened up the possibility of completely isolating the interior and exterior of the house from one another with insulating material and eliminating all thermal bridges.  There would be no through concrete in the panels!!  This started the thought of the house as a cooler – more on this later.

The concrete wythes would be connected via non-conductive cast-in wythe to wythe fasteners.  These are described by their suppliers as being made from “high performance heat and alkaline resistant engineered polymers” or “high-strength, low-conductivity, not-corrosive and chemically resistant” polymers.   These are spaced at defined intervals in the panels per well tested engineering specifications.  They are poked through the insulation at the center of the sandwich panels and have heads that end up being embedded in the concrete with a very small diameter high strength fibrous material connecting the heads together.  These connectors work in tension to prevent any wythe movement under load – basically keeping the exterior concrete surfaces from moving relative to one another under loads and enabling bending loads to be shared between the 2 wythes.  To be 100% technically correct these panels are referred to as “structurally composite concrete sandwich panels” because both the interior and exterior wythes act compositely to carry the external gravity and lateral loads.


The concrete itself is high psi concrete with reinforcing wire and rebar embedded in each of the wythes to enable the concrete wythes to carry structural loads.  Both the interior and exterior wythes are reinforced so both can carry structural loads – this would turn out to be a key factor in enabling thermal isolation for other parts of the house such as the roof.

Why concrete sandwich panels for our exterior walls? Part 3 – Step 2 toward concrete sandwich panels – the interior walls

Having bought into the concept and design aesthetic of concrete exterior walls we started brainstorming about interior walls surfaces.  Out initial thoughts were to use wood to warm up the interior of the house and avoid the dreaded sheetrock as a wall material.  We bounced around a lot of ideas on how to execute interior wood walls while keeping with the evolving design aesthetics.  We came to the conclusion that it would be better to use wood as warming / accent material via furniture, cabinets, doors, etc. where it made logical sense to use it.  This then led to the crazy, wild assed idea of using concrete on the interior walls – an idea that grew on us after initially us being skeptical about it.  So why not??

In parallel with our discussions on interior wall materials we had continued our internet search for precast concrete wall manufacturers.  And during this we stumbled across a company that claimed that they made concrete sandwich panels – panels that had both a concrete exterior surface (known in the trade as a “wythe”) and a concrete interior surface or “wythe”.  And it turned out that this company, International Precast, was fairly local to us – offering the ability to meet with them in person, see their facility, etc.  The fact that they were local also helped from a LEED perspective as it minimized the environmental and cost impacts of shipping the finished panels.

So our next steps were an initial telephone call and then a visit to International PrecastIP_SampleThe net out of these discussions and site tour was that it appeared that they could do exactly what they claimed they could do – deliver concrete sandwich panels that could form the outer walls for both buildings for our project.  So our crazy wild assed idea to use concrete on our interior walls was actually possible.  Not only was it possible – it seemed that properly executed concrete sandwich panels would deliver both our interior and exterior finished walls in a single product.

Why concrete sandwich panels for our exterior walls? Part 2 – Step 1 toward concrete sandwich panels – the exterior walls

In considering the wide variety of exterior materials that we could use I half jokingly made the statement that I wanted a house built of concrete, steel and glass (design aesthetic #1).  Note that all of these are lousy insulating materials.  So why these materials??  From my personal perspective these were part of the commercial / industrial / modernist design aesthetic (we can call this design aesthetic #2) that I like.  So we asked ourselves why not a concrete exterior to the house??  Properly mixed and cured concrete certainly is a very durable, low maintenance cost material that does not require any exterior finishing as is proven in the millions of commercial buildings that are built out of concrete.  And if it is used without trying to make it look like something that it isn’t then it meets a design aesthetic of “truth in materials” (design aesthetic #3) – it is what it is so don’t try to hide this.  And if we use it this way we get the bonus of not having any additional cost for exterior finishing.

concrete exterior

So how could we execute concrete exterior walls??  Certainly we could do poured in place walls – but these required lots of work in on site forms, dealing with all of the quality issues caused by weather, variations in concrete batches, etc.  Our architect / builder had done poured in place walls on a previous project so they were very aware of the issues with using them.  In particular the waste material from building custom wood forms was an issue.

The next thought was precast walls that could be cast in more controlled conditions that would then be set in place on site.  We looked at these fairly closely and even visited a factory where they were manufacturing walls that had a concrete exterior and were fitted with various materials to serve as studs in conventional walls.  We were convinced that we were on the right track on finding a material and method of making walls that met our exterior requirements – the panels would be “cool” as a way to meet our evolving design aesthetic and accomplish the our exterior durability / minimal maintenance goals  .

Further analysis showed that these panels that we had found still had some issues that we needed to consider.  First, they would still require insulation and interior finishing.  In that sense they solved our exterior goals but not our interior goals.  And they did not achieve the goal of thermally isolating the exterior and interior surfaces – we would still have to accomplish this.  They were clearly a big step away from conventional 2×4 construction – but were they a big enough step away??  Another concern was with this particular company’s ability to execute the panels to the detail and precision that we expected our project to require.

Coming up next – Why concrete sandwich panels for our exterior walls? Part 3 – Step 2 toward concrete sandwich panels – the interior walls